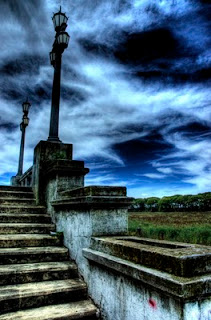
 I have posted this picture before but in black and white. The reason why I am posting this same picture is because one of my followers wanted to see the original photo in color HDR (High Dynamic Range) quality. It turns out that a lot of people are still having problems with producing HDR and to be honest I had problems too in the beginning.
There are several ways to produce HDR. By editing a single photo to 3 photos with different exposures and processing in photoshop I believe that it can be done but I prefer relying on my camera to take the 3 different photos of the same angle with 3 different exposures. One of the most important equipment that you should use is the tripod to avoid movement as the camera will be taking 3 shots. The first frame the camera will snap fast making the picture dark, the second frame will be a normal shot which will make the picture looking like a normal shot and the third frame will be slow which will make the picture bright because the shutter is set low. That is I guess the easiest way I can explain about the 3 different kind of exposures I mentioned earlier. As long as you have your camera on the tripod that is the least problem you have. The main problem is always on the camera settings and people tend not to play around with their camera enough to familiarize with it. Below I will make a short cut of how I set my camera setting and hopefully you can find these symbols in your camera. For those using Nikon cameras this should be easier for you to locate.
1. Menu Settings
EV Steps : ●●● 1/3
BKT Set : AE (flash sign)
BKT Order: N
2. Function Settings
3F 2.0 ]
BKT ] BKT ] Select the multi shots ] +/- = 0.0
+◄ ]
Mode turn it to P
Set your picture quality to (NEF) RAW
It may look like a lot of formula going on but actually it´s very simple. All of the information above can be found in your camera manual. Once you have the 3 photos with 3 different exposures you now have to tone map the photos with a software called Photomatix Pro. What photomatix do is merging all 3 photos into 1. Usually you still have to edit the bright and contrast, I use Photoshop CS4 but it should work with any other photo editing software.
In case you still have doubts, I would be happy to help you out through chat or skype.
Happy HDR hunting!
If you enjoy reading this article you might also want to visit:
STAIRS - HDR Photography Tips
Mom's view - HDR Photography Tips
Metal Flower, Argentina - HDR Photography Tips


I like your blog so much.A beginner can find a lot of useful thinks about photography. Good job and very nice pictures.
ReplyDeleteMike, thanks for the cool comment!
ReplyDeleteTake care,
Rendy Loudewijk
Beautiful photography, I wish much success!
ReplyDeleteObrigado pelo comentário em meu blog. Fiquei muito honrado e feliz com suas considerações. O prazer da arte é provocar sensações. Também continuo a te visitar pelas gratas surpresas que aqui encontro.
ReplyDeleteAbraço!
Angela, thanks so much for your nice wish. I went to see your blog as well and really enjoyed it.
ReplyDeleteCecilio, muchas gracias por el comentario que me dejaste. Me gusta mucho tus fotos y la foto esa de gallo todavia esta en mi cabeza.
Thank you Angela & Cecilio!
Rendy Loudewijk
Hi Rendy, thank you for sharing these good advices, I'll try them soon. Your blog is so cool!
ReplyDeleteHi Giuseppe, I´m so happy you find my posts helpful and I really hope something good and positive comes out of it. Thanks for your awesome comment!
ReplyDeleteFernando, muchas gracias :)
ReplyDeleteInteresantisimo, lo voy a probar! gracias..
ReplyDeleteDejemonos sorprender,
ReplyDeletesi probalo y despues mostrame los resultados, seguro va a quedar barbaro!!
saludos,
Rendy Loudewijk