My first photo to share after leaving this blog idle for so many years. I must say, I spent quiet some time figuring out what I wanted until I found myself standing in front of a beautiful horse just inviting me to take a shot. Initially I wanted to take a picture from the front but all just looked so normal and after moving about, I got this shot. Of course in general you cant go wrong with horses and stables but I just want to remind everyone to just move around to see potential angles to make your photo unique and pleasant to look at. Don't be too bothered about a clear foreground, background and how the subject is going to come out. If you're targeting and focusing right in these kinds of photography, you are bound to have a great shot. Also, you need to concentrate on the lines. I can't stress this enough, the basic of a good photo in general are the lines. If having a store is all about location, location, location...in photography is lines, lines, lines. At least in general anyways.
I won't go too much into details on settings cause its on auto focus and on the green friendly auto mode. Message of the day, move about and don't just stand there!
"The essential joy of being with horses, is that it brings us in contact with the rare elements of grace, beauty, spirit and fire" -Sharon Ralls Lemon-
This photo was taken at Kuda Bahagia Stable, Echo Beach, Bali
So amped! After months or even years away from this blog I am so happy to be back. Just as well cause the rush to pick up my old N75 and D70 is kicking in again. I'm not even sure if anyone is still following or reading this blog but I am still happy to to be back, if anything, this I do for myself.
Just as my previous post, I think it dated back to March, 2011, I now live in Bali, Indonesia. I love living in Argentina but my path has taken me here, at least for now.
Most are probably already using sophisticated cameras now and taking marvelous shots with some crazy effects, I love a good photo when I see one but I will try to keep it old school. Well, maybe not too old cause I don't have time to develop my own prints and neither do I have the space for a dark room.
For those who I use to chat and skype with so intensively, it would be great to get back in touch with you and share new photos. Please private message me and lets have the laughs and idea sharing we use to have before.
On with a new life and a new place. Destiny has taken me to live in Bali and I am loving it. I know I haven't been posting any pictures lately but I will soon, as soon as I settle down here in Bali I will pick that old Nikon D70 of mine and start photo hunting again and believe me...there are tons of potential great spots here.
Please visit my new website on Bali and package tours I offer to:
www.tuamigoenbali.com
It would be great if you could spread the website also, I would really appreciate anyone who would want to put my website as a link.
What happened here? That´s probably what you are thinking when you see this photo and I get so many different response, some negative and some positive. However you see it, this is it, this is the final product. This picture was taken on the edge of the bridge of the Devil´s Throat, Iguazu Falls, Misiones, Argentina. I was careless but it was also inevitable, there is no bargain with mother nature. It was a hot, cloudy and windy day, the storm was forming right above our heads and my lense got sprinkled by the waterfall caused by the strong wind right when i pressed the shutter release button. Each and every effort to retake the shot was useless, sprinkles all the time. Luckily though, my initial intention was to take HDR (High Dynamic Range) picture so I had to take at least 3 shots of the same frame but different level of light exposure. When I got home and saw the original RAW picture I was devastated, I knew HDR would do the magic but looking at its original quality hurts me. I then processed the three pictures to photomatix pro, a software I use to generate my HDR photos and this is the best I can do to save this picture. For me it would have been better without the water sprinkle effects but I guess mother nature also wanted to contribute her artistic talent. What is important from this experience is not to persuade people to like this picture but to know that when you have your basic knowledge on photography whether it be a normal shot or HDR you can still save, recycle and be creative with it instead of deleting the photo no matter the obstacles. Without the proper knowledge maybe this photo would be too severe to save and my trip to Iguazu Falls would be pointless, waste of money and time.
If you want to find out more about generating HDR, please click on the link below:
I was on a small village called Valle Maria in Entre Rios, Argentina when I took this photo. Surely it wasn't the most lively village I've ever visited but Valle Maria has one of the most beautiful country side sunsets I've ever seen. In the early sunset phase I found myself standing in the middle of stunning colors created by the natural orange light the sun gave and everywhere I looked around was like God was painting at that moment as the colors of my landscape changing before my own eyes. Like all sunsets, it only lasted for a few minutes before it got dark. I took out my Nikon D70 and started taking pictures. I wanted to take HDR but I did not have my tripod with me and most of my efforts trying to take HDR failed because the alignment of the 3 frames was incorrect due to hand shakes so I decided to take one last shot using the auto mode. I knew it was the safest thing to do and experimenting on camera setting would take a few minutes and I might lose the opportunity to take the shot because it was our last day in the village. In spite of the panic and adrenaline rush, I knew that I had to at least apply one of the basic rules of photography to bring home with me a photo that not only would remind me of the village but also something that I can be proud of when showing to my friends and family. So what are the few basic rules of photography? Lining and proportion. Sometimes what makes a photo good is how you frame your lining. It almost doesn't matter what the object is but with the correct lining you would probably get one or two compliments of your photo. If you see the lines of the road, the wooden fence, the horizon and even the lines of the grass itself, your eyes is not stressed out trying to find what to concentrate on. Instead it has a pattern to follow and details to comprehend. The other rule I mentioned was to be proportional. In this case the horizon was my guide point to be proportional. As the sky was empty, I did not want to concentrate on the sky so I made 50% sky and 50% road and it's surroundings. My left and right is also important, on the left I have the lines of the road and on my right I have the electric wires. Therefore my end result, my up and bottom is proportional and so is my left and right. Practice framing your lines and also try to be proportional, in some tight situation like this it might just make a difference at the end of your day or travel.
It was a horrible rainy week and feeling a little bit sick so there was no way I would risk to go out for any photo hunting session to get even more sick so I stayed home enjoying the warmth of my lemon tea. Wondering what to post I stared out my balcony window and saw a twig with a couple of water drops dripping slowly from it. It was around 3pm in the afternoon so there was still day light, well...whats much of it anyway but the water drops seem to reflect the day light and made it brighter. I don't know how the water did it but I can explain how I took this photo. Knowing that I was going to take a very close shot I used a tripod to avoid hand shake. I thought about taking the shot the way it was with the day light but I knew I was just going to get a grey photo with unwanted detail of the apartment across my building with their hanged laundry blurred as a background. I did not want to miss out this opportunity though cause the twig and the water drops just looks beautiful so I decided to make the surrounding and whatever background details out of my focal length reach pure black. By doing so I set my shutter speed to 1/50, Aperture F4.5, Mode Exposures +4.7. This setting is already almost automatic for me whenever I find myself in these kind of situations. It never fails me. It never fails because with a fast speed, open aperture and high exposure the unwanted detail without enough light will become dark or black and the concentrated object within your focal length's reach has enough light to show the details of your object which is what the aperture does and the white details of the twig and water becomes brighter because of your high exposure setting. That setting is my most reliable setting and if the circumstances differ slightly I only need to adjust the setting a notch up or down. Because I was using my Nikon D70, this photo is originally in color. If you would like to convert your color photos to black and white, click here: how to best convert your color photo to black and white. I hope no bad weather or health condition stops you from picking up your camera and start snapping. I wish for a good health for all us.
This picture was taken on one of my photo hunting sessions in Recoleta, Buenos Aires. It was a dull day at the moment with horrible grey clouds all over and as far as I can remember even my eyes were seeing black and white. I had to have a strategy to bring home a smile and at least a couple of good pictures. Besides I was using my Nikon N75 and a black and white roll so anything that did not come out right would be a unnecessary additional cost. So that day, I was not hoping for any shadows, bright colors or sunshine. Instead I took the grey sky to my advantage as a background and any bird that passes my camera would be a potential black contrast to the grey color. Luckily Buenos Aires has lots of pigeons so I did not have to wait in vein for it and to spice things up I slightly angled my camera 45° just to get enough of the top part of the dome that I need and making it look more interesting. With the digital camera you can take as much frames and experiment as you want without having to worry to develop your rolls and paying lots of money. The question is, how long are you going to experiment? Not that there is anything wrong with experimenting but knowing the basics in photography and taking it from there to another level step by step is what will endure you in the industry and perfecting your craft. My advise for beginners is to write down the result or diagnostic that you see on your camera for each shot so you can compare it with other shots you took with different lighting situations, moving objects and even the different focal lengths. Take advantage of what information the modern camera can provide you and not just because you don't have to pay for the film rolls and the developing process.
On my previous post on Simple Is Beautiful I uploaded a photo that I took of a wooden dock and over-exposed it and making it look simple. I explained that a photo with less detail could be as interesting as with lots of details or even more. With the available space you can always write something you believe or your feelings to those you consider special. I asked my visitors to write something for me to post on the 30th of August (My birthday) and here are the results. Of course if you are more advanced in photoshop you could always make something more creative to your photos, perhaps add a few artistic patterns to it. Mine is just basic adding text to a photo. Valery Lorenzo Photography His unique classy way of capturing light and shadows captures the life and moment of his black and white photography. Fresh and amazing ideas his work speaks for itself.
Guiseppe Cuchiarra Photography Photos of places and events around the world. Clean and very crisp quality, Giuseppe's photos takes you along with his travels. Astrid Wasistyanti Blog A proud Indonesian girl who shares her thoughts and experiences, she chooses to write her blog in Indonesian Language or Bahasa Indonesia. Away from her beloved country she still values her roots. Her positive young and intelligent vibe makes her blog friendly and open for new friends from around the world.
There has been questions going on about making an HDR image out of a single photo and whether it was possible to achieve it. The answer is, yes it is possible by manually adjusting the exposures in photoshop or any other photo editing software and generate it to become HDR with a second software you'll need such as Photomatix Pro or HDR Darkroom. After the generating process you would need to tone map the photo to get the end result you prefer. From there everything should be simple cause the software should do the rest of the work for you. Nowadays, there is nothing impossible to achieve in photography. There are shortcuts that we can take as an advantage but I suggest to always know your basic photography and camera setting knowledge before using these shortcuts. The art of photography apart from the end result itself is the process we do with our cameras, the craftsmanship and how we paint our photos with lights by using our knowledge and skills. Apart from that, the results are usually more stunning doing it the proper way not just in HDR but in all types of photography. Don't be a lazy photographer. It´s a hobby with a beautiful process in learning to master it. Have fun with your experiment in HDR from a single photo. If you would like to ask me more about how to properly set your camera for HDR please send me an email.
There is something peaceful and beautiful about simplicity. You can have all the details into one photo but still would get bored easily. Being simple does not necessarily mean dull or boring. Being simple is always easy to relate to and soothing. I over-exposed it by customizing the white balance and slowing the shutter speed to let as much light in as possible to whiten the sky and the river but still keeping the detail lines of the dock visible. It was taken mid-noon when the sun is right above my head and that helped a lot in the process. To be honest I had a couple of tries and errors taking this picture. I stood there for a good 15 minutes, that´s a lot of time but I guess persistence pays it all off. With photos like this you can just leave it and appreciate it as it is or you can write a beautiful sentece or two for someone you consider special.
Actually, that just gave me an idea. How about in the comment box you write something beautiful, something simple and on the 30th of August (My birthday) I will post back this photo with what you wrote and underneath it your name as the author of the up lifting words. I hope you guys do write back because I´m not such a good writer.
Almost all sunset shots come out if not perfect almost perfect. It's one of the common themes that is taken amongst photographers from different level of expertise. Apart from being easy it is also rewarding. I want to share a tip or two about taking pictures of sunsets. Most people tend to take just one single furthest object along with the sunset as a background to create that black and orange contrast. Which is fine, but I just want to say that having both foreground and background in sunset shots are just as rewarding and fills in the empty spaces. Although taking pictures of sunsets is considerably easy, the peek of the moment itself passes by very fast and you might miss that golden chance if you are not prepared. Make sure to arrive more or less an hour earlier and have a look if you are going to take shots from different angles and positions. If you are going to customize your settings, take advantage of whats left of the natural light. During sunsets it can be too dark to set your camera. Take my word, you do not want to go home frustrated because you did not see the panoramic sunset because you were too busy setting your camera or you got there just a few minutes late and don't have a sunset shot to take home. If you are traveling, ask the locals or tour guide where can you go to see an unforgettable sunset view. Well, I hope this simple tips can make a difference in your sunset pictures.
Legend has it that a god planned to marry a beautiful aborigine named Naipí. However she already had a mortal lover called Tarobá. The two lover fled in a canoe to find their own piece of land to call home far away from their village. In rage, the god sliced the river creating the waterfalls, condemning the lovers to an eternal fall. The waterfall system consists of 275 falls along 2.7 kilometers (1.67 miles) of the Iguazu River. The Devil's Throat (Garganta del Diablo in Spanish or Garganta do Diabo in Portuguese) is a U-shaped fall that measures 82-meter-high, 150-meter-wide and 700-meter-long (490 by 2300 feet) cataract, is the most impressive of all, and marks the border between Argentina and Brazil. Put this destination if you are travelling to South America and make sure to have an entrance permit for both countries to be able to appreciate the views from both sides. I took this picture in 2003 with my Nikon N75. I had not yet bought my Nikon D70 DSLR because it was launched in Argentina in late 2004 but I was already saving up for it. I hope to make a review of the D70 in my future posts because it performs really well. Anyway back to the picture, I mounted a P gradual colored series number 665 Cokin filter which made the color effect on this picture. Cokin filters have been in the photography industry for ages and have evolved tremendously with their new products. I have around 15 Cokin filters which serves different purposes and none of them have ever failed me in any way and I recommend Cokin products to everyone. To find out more about Cokin products please visit www.cokin.fr
Before I start I would like to say, yes, it is not a real shooting star and yes I realize that the moon should be bigger than the stars. It´s a real moon by the way. Anyway, I realize that I have been talking about knowing your camera settings and spend less time post processing. Let me tell you the story behind this photo first. Originally this is a photo of the roof of my parents house which we all consider to be the family house where we gather and spend quality time together. I like to believe that my late grand parents whom I love dearly are watching over us and the house. Well, that is what the shooting star represents. There was no other way than to use photoshop to make this photo as it looks right now. I would have to wait forever for a shooting star to happen right before my eyes. Photoshop is a very powerful tool and what I did with the original photo to look as it is now is the least what photoshop can do. I´m sure everybody these days are familiar with photoshop and I encourage everybody to learn and use it to meet whatever needs you need to perform. However, don´t become lazy and dependent on it for your photography work because that can develop to become a bad habit. If you are interested in how to make these effects please do not hesitate to contact me and I would be happy to help you out. I´m not a photoshop expert but I love sharing what I know to anyone.
Most photographers today when asked who are their favorite top five photographers would be Ansel Adams. One of his famous photographs such as moon and half dome inspired lots of photographers from all over the world even until today. Adams who was born in 1902 did not have the same privilege as we do today with photography made almost user friendly for both beginners and professionals, not to mention digital and photoshop. His black and white photography is legendary, there is no comparison to it and his color photography are just amazing. I consider Ansel Adams the genius in photography and through his work we can all learn the art and beauty of photography. If you have not yet stumble upon his work, I suggest you look him up in google and go through his photos one by one and really try to live the wonderful moments he had while he took the photographs. Here is a link I always go back to see Ansel Adams work : www.anseladams.com
There are too many photographers out there who are being sued by their models and property owners. One of the many reasons is violation of privacy and defamation. As a fellow photographer, I would advice to get a release form signed by your subject or property owners before taking any pictures to avoid future legal actions. Please be a responsible photographer and strongly take this into consideration. To find out more about release forms please visit: http://photography.lovetoknow.com/Photography_Release_Forms It is a very informative website and gives examples like when is a release form needed.
I always carry my camera along with me every where I go. Depending on the occasion I would choose what equipment to bring. It was a beautiful Buenos Aires Saturday afternoon when I took this picture in one of Buenos Aires finest parks called El Rosedal. The plan was to only have a walk around the park and go boat rowing so I only took my camera and a 18-70mm lense to take normal shots. During the walk I did not find anything interesting to take but as we were on the small wooden board I turned around and there it was, the perfect sky, trees and small island. Before taking this shot I already thought how it would be in black and white so I decided to take a picture of it. That is what this post is all about today, looking things that is not the obvious and what your eyes directly receives. This photo in color looks like just another photo but when I converted it to black and white the details and contrast becomes alive, the clouds, the trees and the island itself came together nicely giving this photo the wow factor. So the next time you see something, try to visualize the scene from another point of view for example in black and white, HDR (High Dynamic Range)or sepia and so on. Behind anything normal there is always a potentially stunning outcome. So look out and don't forget to consider the potentials.
If you like this post you might also be interested in the link I´ve prepared to compliment on today's topic:
I have posted this picture before but in black and white. The reason why I am posting this same picture is because one of my followers wanted to see the original photo in color HDR (High Dynamic Range) quality. It turns out that a lot of people are still having problems with producing HDR and to be honest I had problems too in the beginning. There are several ways to produce HDR. By editing a single photo to 3 photos with different exposures and processing in photoshop I believe that it can be done but I prefer relying on my camera to take the 3 different photos of the same angle with 3 different exposures. One of the most important equipment that you should use is the tripod to avoid movement as the camera will be taking 3 shots. The first frame the camera will snap fast making the picture dark, the second frame will be a normal shot which will make the picture looking like a normal shot and the third frame will be slow which will make the picture bright because the shutter is set low. That is I guess the easiest way I can explain about the 3 different kind of exposures I mentioned earlier. As long as you have your camera on the tripod that is the least problem you have. The main problem is always on the camera settings and people tend not to play around with their camera enough to familiarize with it. Below I will make a short cut of how I set my camera setting and hopefully you can find these symbols in your camera. For those using Nikon cameras this should be easier for you to locate. 1. Menu Settings EV Steps : ●●● 1/3 BKT Set : AE (flash sign) BKT Order: N 2. Function Settings 3F 2.0 ] BKT ] BKT ] Select the multi shots ] +/- = 0.0 +◄ ] Mode turn it to P
Set your picture quality to (NEF) RAW
It may look like a lot of formula going on but actually it´s very simple. All of the information above can be found in your camera manual. Once you have the 3 photos with 3 different exposures you now have to tone map the photos with a software called Photomatix Pro. What photomatix do is merging all 3 photos into 1. Usually you still have to edit the bright and contrast, I use Photoshop CS4 but it should work with any other photo editing software. In case you still have doubts, I would be happy to help you out through chat or skype. Happy HDR hunting!
If you enjoy reading this article you might also want to visit:
I´ve been receiving emails lately with different kind of questions about camera setting tips, doing an online photography workshop session and sometimes people would send their photos for opinion on how they can improve on techniques which I enjoy replying very much. However I have also been receiving emails on how to make money from photos and it seems that a lot of people are trying to find a way to cash in their photos which I think is a very good thing to do. At this moment I am not selling any photos nor am I trying to sell one just yet because I feel that I am not ready to do so. Guys, I´m sorry if I don´t have an answer for this one for now but I did look it up in the internet and I found a very interesting website on how to monetize your photos. I have been reading back and forth the website and I would not suggest it to anyone if I did not believe in it´s content. So go ahead and visit http://blogs.photopreneur.com and get the most information out of it. You might want to bookmark the website so you can easily find it again. You can also find photopreneur.com in my link list.
Night lights photography is very popular amongst beginners and professional photographers and I have never met one that hasn't at least once taken a picture of the night lights. For pros shooting this kind of low lights situations may seem like a walk in the park but for beginners it can be frustrating especially when trying to use the manual mode. Just remember when using the manual mode if you set the shutter speed low you should set the aperture higher and when shutter speed is high the formula is the contrary. In my next post on night lights photography I will talk more about values of shutter speed and apertures and how it would effect on the results. Another thing that is also important when shooting in low lights situation is to always use a tripod to avoid shaking unless you have very steady hands which is also a hard thing to do because you most probably be using low shutter speed and it might take a few seconds depending the needs of the photo you want to achieve. In case you already have experience in night light shots and had no problems with it, it would be a wise thing to do it again just for the sake of tuning the know-how and avoiding forgetting small details.
Speaking about lines in nude photography, my first topic is about how important to have a line in nude photos and the second will be about where to draw the line between fine art nude and pornographic nude. I know there are no obvious nude in this photo but I think it serves it's purpose well for the topics I chose for today.
1. Stress on the line in nude photography. I have mentioned in my previous posts that lines in photography in general is very important and is considered to be key element when someone gives their opinion whether or not the photo is great or poor. It´s the same rule as in nude photography. Have you ever thought what your eyes are doing when you are looking at a photo? For those who are not aware, first your eyes are actually following the lines in the photo from one end to the other, second and so on the other details. Lines creates dimension in your photos which does not make the eyes tired nor sends boredom to your brain. On the contrary, your eyes are actually sending interest because it is not lacking activity. Nude photography is not just placing a naked model in front of your lense and start taking photos. You have to pay attention on your model's curves and lines, not to mention lighting to create shadows but we'll talk about lighting in nude photography in another opportunity. Make sure you have some kind of contrast in lines or curves in your nude photography for the eyes to follow and not just a naked body. When I mean curves, it does not mean that nude photography is only for the violin shaped body. That's the amazing thing about art, there are no limits. We must think outside the box.
2. Where do you draw the line between nude art and pornography? I have heard from a lot of people that nude art is black and white whereas pornography is in color. I often hear that all nude materials are considered pornography. It´s a question that answers are relative and can never be absolute. I draw the line looking at the purpose and the end result. Nude art in my opinion does not have the purpose to arouse anyone sexually and it should be able to portray a different meaning other than just lust. For example when I went to a nude photography exhibition I saw a couple of photos of a naked woman one portraying "fragile" and the other "freedom".
What about you? Where do you draw the line between nude art and pornography?
Ok fellow photographers get your knowledge on camera settings tuned up because the world has been waiting for the 27th of August 2010 since 2003 of a rare sighting that none of us living today will ever see it again. Planet Mars will be the brightest in the night sky on the 27th of August 2010 at 11.00pm UAE local time and to the naked eye it will look like a large full moon. Only on this night the earth will look like as if it has 2 moons. Make sure you don't miss this once in a lifetime experience because the next time Mars may come this close will be in the year 2287. Get your equipments geared up and your camera know-how tuned up so you may have amazing results. I know that lots of magazines are willing to display a photo of this rare sight from a common photographer like us. Start practicing from now on and good luck!
When I am at home and have nothing to do I usually go photo hunting and sometimes just before I leave I would tweet or post on my facebook saying that I´m off to go photo hunting. I would then receive text messages or phone calls from my friends asking where am I headed to thinking that I am going to go somewhere far. Actually, I was just heading to a park four blocks away from my house. That is exactly what I want to talk about today, potential photo hunting sights does not necessarily mean that you have to go the distance. A lot of people take their backyard sometimes for granted or their 23rd floor apartment view of the city scrapes as nothing and they drive 2 hours to go photo hunting. So if you are low in budget this weekend and have nothing to do, make your day productive and one of them is to take a walk in your neighborhood and take pictures. Who knows whats out there, maybe you come home with a stunning photo that you can brag about to your family and friends and if you come home with a not so good result, at least you know your weakness in photography and find a way to improve so when you go for your next photo hunting session you would know what to do to avoid making the same mistake. Either ways, you learn and there is nothing more productive than learning. Another point that I want to make is not so much whats going on in my head during the hunting session but actually whats in my head before leaving my house to go photo hunting. Before I leave I pause and I think where I´m going to and picture it in my mind what can I expect there. For example, in the park I can expect people playing with their dogs, children running around, ducks in a pond, someone feeding the pigeons, lovers reading books to each other and so on. Knowing what you can expect helps you in advance what kind of camera setting you need. If you know how to set your camera on the spot then you are good to go but if you still don´t know how to set your camera then take a longer pause and start looking it up in your camera´s manual book or even in the internet just in case you need to change your camera settings for a specific needs. Once you are comfortable, then you are also good to go.
Details in photography is very important. However too many details can be boring to look at especially if they have the same lines, patterns and colors. By minimizing the focus points your photos can still appeal interesting to look at even if the rest of the details are out of focus. If you feel there are too many colors try converting it to black and white using photoshop or other photo editing software. Play around with your focus points if your camera has a multi focus points. Make sure to position yourself in the right angle to line up your objects correctly from near to far so when you focus the middle point you have what is the closest and the furthest from you out of focus leaving in the middle part well focused. As long as you position yourself correctly you can chose which part you want to focus in the order you prefer. I chose this photo of the Argentine Presidential guards which I took a couple of years ago to demonstrate what kind of situations are best to make these kinds of photography and I hope it serves its purpose well. By practicing this technique you will be more acute in angle strategies to get the perfect lines and framing scenes through your view finder.
Almost everyone I know takes pictures of their pets and it doesn't matter what level of knowledge they have in photography most pets photos come out well. In my opinion animals are born photogenic and there are little mistakes to make. Those photos are then uploaded to your computer and you share them with your family and friends through facebook, myspace or blogs, some puts them in a frame and place it on a table somewhere in your bedroom or living room. What usually happens when you want to hang it up on the wall in a big painting size like? The usual answer I receive is that it does not look as good as when it was in the small frame. I am not talking about stretching the pixels as most digital camera today comes with 6.0 up to 12 mega-pixels. I am talking on the artistic point of view. Here is where the software photoshop comes very handy. There are lots of types of filters you can find in photoshop to make your normal photo to looking very artistic that your living room deserves. The photo I posted is my dobermann when he was still in my care, now he is in Brazil with a great family taking good care of him. As you can see in the photo, I have added a texture that makes the photo look like a drawing or painting and it looks very lively and well when I printed it to a poster size and framed it for the wall. This is what in my opinion that gives the extra artistic look that is often not considered by many people. For this kind of textures that you see in my photo, you can find it under the filter tool in photoshop and choose sketch to look for different kind of textures that suits well to your preference.
"No man can be condemned for owning a dog. As long as he has a dog, he has a friend; and the poorer he gets, the better friend he has." - Will Rogers
On my last post on portrait photography I mentioned about knowing your model's name and encouraged to get to know their personality to create a relax and fun ambiance. Today's post is more on the camera and lighting settings that I hear far too often how hard it is to achieve portraits in terms of lighting. The camera setting for this photo was set to manual. How I love to take photos in the manual mode where I can control how much light I want and how it effects the results seen in the photos. The camera setting was set as follows: Shutter 1/8, Aperture F4.5 and Exp +/- +4.7. I also placed a small soft spotlight 20 to 25 degrees from the model's face at a distance around half a meter away from her to illuminate her eyes. Some photographers would take extra soft light and would place it 45 degrees behind the model to illuminate the model's hair from behind and that works perfect if you are taking a portrait photo with your model´s hair lose. As you can see, it is not as difficult as you imagined it in terms of settings. Just remember in photography we paint with lights. What is hard in portrait is finding the right pose for the models. There are so many types of portraits to try out there, from the traditional, formal, informal, fun and it goes on depending how creative you are.
You might also be interested in the link below on my older post that covers the basic approach on portrait photography: Portrait Photography
A lot of new born photographers tends to like taking objects with black background and dark environment with colorful objects like you see in my photo that I post today to get that strong contrast between the object's colors and the background. What they attempt to do to achieve this type of photography is to have a single light source and turn off the lights to make the room darker almost too dark to see and work with. In the end they will only complain with the results being too dark, hard to focus or they cannot seem to make the background black or very dark because of the single light source. If you are one of those photographers, don't worry, it's good that you are experimenting and learning from your mistakes. Here is what you did right, having a single light source preferably a small spot light that only illuminates the object and place it close to the object. What you did wrong is turning the main light of the room off to get that dark sensation that you imagine seeing in your photo. Leave the lights on and take anything black you can use as a background. For example, I used my black jacket for this photo setting. After setting the area where you are going to place the object, set your camera correctly. For better quality use the M (Manual) mode and not the Automatic mode in your camera. In the manual mode you can adjust the shutter speed and the aperture. Let me share with you my camera setting when I took this photo. Shutter 1/50, Aperture F4.5, Mode Exposure +4.7. By setting your camera more or less in these range, I can assure you that there will be no photo editing required. That´s the point, we should keep our photos zero or up to minimum for editing so we don´t have to spend a lot of time in the computer and have more time to take more great photos.
"Every moment of light and dark is a miracle." -Walt Whitman-
Whether you are here to learn how to take great photos or looking to make money taking photos of children, let me leave you with my experience taking photos of children and hopefully you could have a head start. (Remember when taking a picture involving a person a legal release form should be signed by first and second party and a witness if possible. Involving an underage subject, you must have the parents or the legal guardian's consent)
Children and animal photography is not much difference, they can be really disappointing or with the right camera settings and know how, they can be really rewarding and one to keep for the rest of your life. Lets talk about the camera setting. If your camera has a AI FOCUS settings, keep it there to get sharp pictures more consistently. If you have a multi focus points, use just the center one. This prevents the cameras auto focus widely focusing the background or unwanted details. Also, make sure you set your camera to multi shooting or continuous shooting mode to not lose any precious moments. Continuous shots usually go from 3 up to 4 shots. Remember to set your camera to high speed if you are taking it manually. Another important tip to get stunning children photos is the setting or location. Usually the child´s house is the best location. They feel more comfortable as they are in their element. They know which spots they can be naughty and have their toys close to them. Follow them wherever they go of course within reason and be close to them so you can also be part of their game. Always have your camera ready to take that shot, keep your fingers ready. Have both eyes open, one looking through the camera and the other to see what is happening around the children to anticipate the unexpected moves. Great children photography are usually taken when they are off guard, that is when the eyes have that special sparkle. It will be great if you can visit the parents and the child in their house the day before you plan to have the photo session.
Portrait photography is not for every body. Sadly to say, it is not one of my strongest points but I am very happy with the way this picture came out. I found out that taking close up portrait photos is not just pointing your camera to the subject and start snapping and get a stunning result. It´s more than that. Knowing your subject´s name and personality really helps how you want your portrait to come out. My suggestion is to know your subject and have a nice conversation before starting the photo session. Get to know their personality, laugh with them, that way you see what you want to see in their eyes and capture that moment. By knowing their personality you get to know what is their comfort zone and what is not. Taking your subject to their comfort zone or out of their comfort zone works both as well as long as you know the limits. Of course lighting, angles and camera setting is also important but today I just want to share what is out of the box. We as the photographers need to make our subject as comfortable as possible and make the sessions as fun as possible. Without the personal approach, you can spend 10 minutes and wrap the session up because your subject seemed bored or you can spend hours and hours taking pictures because you manage to create a bond and a fun and relaxing atmosphere for both you and your subject. Next time, my portrait photography post will touch more on the technical part of how to set your camera and lighting tips.
"A true portrait should, today and a hundred years from today, the testimony of how this person looked and what kind of human being he was." -Philippe Halsman-
Going back to the basic knowledge of photography and practicing it is very important and should be done on a certain basis. Some of us may now know the most complicated photography skills which requires lots of complicated settings of camera, lighting, studio, models and location but tends to forget the basics and find themselves off guard when asked or have to take basic shots that the automatic cannot perform. Today I had nothing to do so I went to Jorge Newberry Aiport or also well known as aeroparque in the heart of Buenos Aires and packed my camera with me. I went to shoot some long exposure photos and came home with very satisfying results. I pictured it in my mind how I wanted the shot to come out, set my camera and started shooting. I must say, the setting part took a couple of minutes until I got the right setting and felt comfortable shooting and that is the point of this article. Don't feel too big to go back to the basics there is nothing wrong with that, on the contrary it will only make you perfect. Every photographer should make this a new habit, amateurs and professionals. I took this photo with my Nikon D70, Manual setting, focal length 18mm, Shutter 25 and Aperture F22.
"An investment in knowledge pays the best interest." -Benjamin Franklin-
One of my followers in this blog sent me an email asking me about overexposed photos & how to fix them. Unfortunately I had to tell him the truth, 85 percent of overexposed photos are too difficult to fix. Different with underexposed photos, they are easy to fix. In his reply he seemed sad and disappointed because it´s the kind of shots you don't get second chance taking. A couple of days later I offered him to do an online workshop with me through skype & he agreed. During the workshop session I explained to him how to set his camera to avoid overexposing shots and also persuaded him to convert the overexposed photos to black and white using photoshop. A few minutes later he called me back & sounded really happy and positive. He showed me the results and it was stunning. Unfortunately he did not give me the permission to post his photos to compliment this article for some third party reason, I respect that and I totally understand so I posted a couple of my old photos instead that were badly overexposed and edited it so that everyone can see what I mean.
You might also be interested in the link below for some photography tips I wrote on how to best convert color photo to black and white and avoid bad habits to become a better photographer.
Photography has evolved rapidly and made easier over the passing years, fortunately also cheaper for both who are taking it as a hobby or a job. Having that said lots of new photographers emerge and consider the advantage of the modern world of photography as a short-cut which only means one thing, creating new bad habits. These new bad habits usually brings frustration and could affect negatively to your creativity and your photos. Avoid these habits and enjoy this hobby that many of us love.
1. Not taking the time to learn how to properly set your camera. Think about on how you want your photo to come out before taking it. Learn as much of your craft as possible and stop over shooting. If you are one of those photographers who thinks it´s ok to shoot lots of photos because in digital photography the frames are free anyway, I suggest to stop thinking that way cause you will only have quantity and not quality photos and you wouldn't know where to start to improve and correcting your errors.
2. Taking photos in RAW format by means to touch up and fixing the exposure with a photo editing program. Don't use RAW as an excuse to be a sloppy and lazy photographer. Taking pictures with the intentions of fixing it later only makes you a poor photographer and a decent post-processor.
3. Blaming your gear for a bad quality photo you took is so very sad. New photographers assume that spending on expensive cameras, lenses and flashes will better your shots. Sure there are better bodies and lenses to meet certain needs to improve the quality but if you don't know what you are doing, whats the point? You are the photographer who decides to push the shutter release and capture what you saw through your camera lense. A camera is simply a tool, if you don't have the knowledge you will never get the optimal results.
If you feel associated with one or all of these bad habits, stop and start learning. I used to be associated with all of these bad habits but I devoted myself to be a better photographer. If you don't have time to take a course in photography, take advantage of the internet like i did.
"You have to devote yourself totally to be successful at it." -Elliot Erwitt-
I want to share a video and still images by Herb Ritts today posted by Herbrittsfoundation in youtube which brings justice to his amazing work and basically how and why I fell in love more to photography especially black and white photography. I had the privilege to go to Herb Ritts exhibition in Vienna, Austria in 1996 and see most of his work on display and it was an amazing experience. Herb Ritts Exhibition is very seldom these days but I suggest to go if you ever hear of one and I can assure you that you will find yourself inspired and motivated in a new positive way and if you are one of those people who associate nude fine art photography as pornographic scene, watch this video and think again. There are tons of pictures and videos of Herb Ritts in the internet, please search and read about him. He is no doubt my number one photographer icon and influence.
"Many people who excel are self-taught." -Herb Ritts-
This ship was named after an Argentine Lieutenant Commander Julián Irízar and was launched in February 1978. The commander commanded this ship when a Swedish Antarctic Expedition led by Professor Otto Nordenskjöld was trapped by the Antarctic winter, the mission was a success. Almirante Irízar's peacetime missions include annual campaigns to resupply and rotate the personnel assigned to the Argentine Antarctic outposts, as well as conducting and supporting scientific endeavors in Antarctica. She has also conducted several passenger tours to Patagonia and the Antarctic. In 2007 a fire broke out in the secondary electricity generators and the captain had to ordered evacuation. Fortunately the damages are fixable and repairs in Buenos Aires are expected to take until mid up to end of 2010. God's speed Irízar for your recovery and hope to see you in the open sea again where you belong!
Photography Tips: The Irízar is not as big as a cruise ship but it's still big. I took several shots of her but I decided to keep this picture. The other pictures which I took of her was a full body shot but there was lots of tourists and parked cars on the foreground and some tacky buildings on the background. There was too many unnecessary details which I could not avoid so I kept it simple and kept the most important part of the Irízar which is the bow (front part of a ship)which she uses to break ice for rescue missions. Keeping it simple refers back to one basic principal that less is more. I used my Nikon N75 for this picture and to fix the grey dull clouds I used a cokin sunset creative filter P198.
"A ship is always referred to as "she" because it costs so much to keep one in paint and powder." -Chester W. Nimitz-
This is one exhibition that a lot of people have been talking about in Buenos Aires and by the looks of the participants and preperation it should be a very interesting one to go to. From Photography, Paintings and Sculpture, all going to be in one place, you´d definitely find me there. Folks, if you are in Baires, put this event on your agenda! See you there!
Date: 16th to 20th of September 2010 Time: Thursday to Monday from 13.00 to 22.00 Location: Multiespacio Darwin, Hipódromo de San Isidro, Av. Santa Fe 35, Esq. Av. Márquez.
For more information, please visit the link below: www.artespaciosanisidro.com.ar
Nothing is more beautiful than to see a woman touch her belly knowing it comforts her unborn child.
I am not going to write a long post today but I just want to remind everyone that we should take advantage of being able to manipulate light and produce shadows by positioning it well. In most color photography the effect of shadows in my opinion does not work quite as well as in black and white or as in sephia photos. In black and white nude photography for example shadows produced by a well define abdominal may look like sand dunes of beaches or deserts. Take your time and position your lights well to get the perfect shadow you want for your picture.
"Find beauty not only in the thing itself but in the pattern of the shadows, the light and dark which that thing provide." -Junichiro Tanizaki-
Sets of photos in one frame is something you would like to consider making. It´s fun to make but also requires you to be creative as you would have to choose multiple pictures that compliments one another into one frame. Depending what theme you choose, your sets of photos can look both professional that you can use either for your office decoration or a presentation and also a nice home decoration. The key of making photo sets is not only the obvious facts like all the pictures must have the same theme but also the colors. The idea is to compliment in themes and colors. Choose well the colors of the frames, layers and the photos itself so it´s inviting and soft to look at.
As you can see, there are no limits when thinking of themes. The only limit to being creative like I´ve mentioned before is ourselves. The skateboard and puppy theme was pretty easy to make I must say because the main object or subject itself was in one location and usually these kind of themes just takes one session without moving to another location. Now the landscape theme was a bit of a challenge. Three photos of the same theme but 3 different landscape...but still the same theme. I was puzzled to what to take or where to go, it did took me sometime to finish and I guess the best of me along the way as I had other projects in mind that had a deadline for delivery. My personal tip for you is to never delete your photos and keep them well archived by places, types or names that you can easily remember.
High Dynamic Range(HDR)photography is both challenging and rewarding. It´s challenging because you really have to know how to set your camera for HDR and once you set it correctly you have to really know when is the right condition to take HDR especially when you are hunting for cloud effects like you see in my photo. Some days there are too little clouds and some the sky is all covered with clouds. For those of you who are new to HDR photography, the simple way to explain it is making 2 or more photos with different light exposures into one photo. For this particular photo I used 3 different light exposures, -2, 0 and +2. I then process the tone mapping of the 3 different light exposure with a software called Photomatix Pro 3, by then I should have a very rough HDR result but still needs some smoothing to do which I do with Photoshop CS4. Originally this photo is in color but I´ve decided to convert it to black and white to show you how dramatic black and white HDR photos can be. Please refer back to my older posts for more HDR photography and the best way to convert color photos to black and white to not lose the quality of your photos. HDR is so rewarding once you get the perfect result, somehow it´s like a surprise because you can never predict how the photo will look like until you see the end result. A very important tip though, you should always use a tripod as you will be taking 3 different light exposures meaning the camera will snap 3 times. The camera needs to be stone rock steady. You should change your camera setting from single shot to multiple shot. Please feel free to contact me if you want to talk more about your camera setting or if you are having problems producing your HDR, I would be glad to help you out.
This photo session was actually fun and unexpected, it was taken outdoors on one late afternoon on the roof of my house. The original setting was not as dark as it looks right now and there was definitely no spot light on top of the model. How I made this photo? Photoshop CS4. Before continuing on how I made this photo look the way it looks right now, I just want to say that editing in Photoshop CS4 is very easy. The tools are made user friendly and there are tons of tutorial videos on youtube on every editing scenario possible. I never went to a Photoshop course although I am thinking of attending to one but what I am trying to say is "it´s that easy." Photoshop CS4 Portable can be really handy when you are travelling. Save it in your pendrive and start editing in whatever computer you are using.
Editing Tips: Lets move on to the fun part. I used the lighting effects in Photoshop CS4 and to locate the lighting effects tool just follow these steps; Filter --> Render --> Lighting Effects. You will now see a preview of your photo that you wish to edit and an oval looking shape with a dot in the center, left, right, bottom and top of the oval. The top dot is your source of light and use the center dot to move the source of light wherever you want within the picture and your left and right dot is how bright or dim you want the light effect to be. The narrower it is the dimmer the light becomes and on the contrary the broader it is making a circle shape like, the brighter the light will be. The top and bottom works the other way round as the left and right dot. Experiment by moving it around and press "ok" when you have found your desired light effect. Note that as you narrow down the oval using the left and right, what is left over of the picture outside the source of light range will become darker. Happy editing folks!
The Minahasa House is originally from the North Sulawesi Province of Indonesia. It is recognized in Indonesia as one of the best earthquake resistant home construction suitable for tropical region. The Minahasa house is mostly made of cempaka, lingua and jati (tectona grandis) woods. There are no architects or a software involved to design and construct these traditional wooden houses. In fact, these houses are built by craftsman whose skills are passed on generation to generation by families and each generation tend to improve both materials and construction.
This picture was taken with my Nikon N75, ISO 100 black and white film and a red filter. Please refer to my older posts about how color filters may affect the outcome of your black and white photos.
"Home is a place you grow up wanting to leave, and grow old wanting to get back to." -John Ed Pearce-
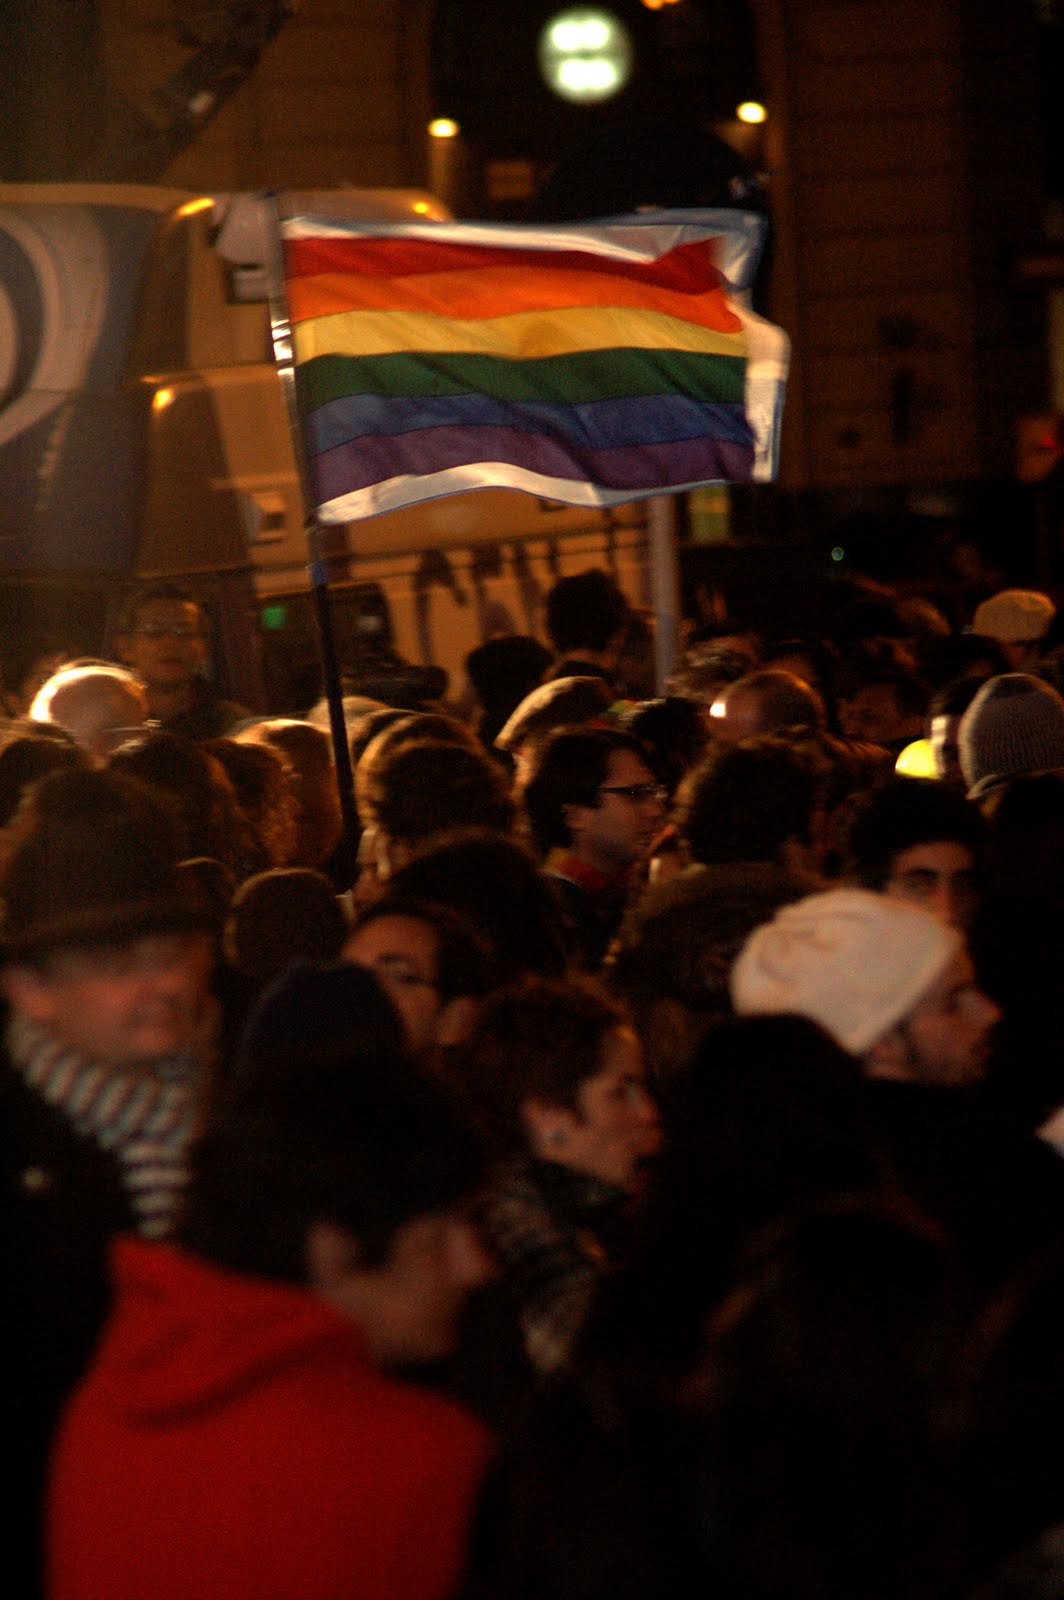
Hundreds of people gather today, 13th of July 2010 in Plaza de la Republica (The Republic Square) by the Obelisk of Buenos Aires to sing one song, dance to one rhythm and stand up for one cause; "Equal Rights for Gay Couples!" The same kind of song when women unite as one for their equal rights, the same kind of song when the African American & Black South African unite as one for their equal rights and the same kind of song we sing for our rights for housing, jobs, public accommodation, equal access for government benefits, equal protection of the law, marriage, authority to make medical decisions, handle insurance claims, receive relief aid, our rights by nature etc.
Remember that gay couples are only asking for EQUAL RIGHTS NOT SPECIAL RIGHTS. "We will never have true civilization until we have learned to recognize the rights of others." -Will Rogers-